
You furthermore might have to be compelled to move quickly, once you begin the weld as a result of the warmth that creates the weld puddle dissipates quickly in copper.
TIG welding copper isn’t laborious, however, it doesn’t get done that usually. it’s totally different than steel, however, it’s easy enough. You can’t treat copper-like steel; the microscopic details area unit varied. concentrate on those, and your project is going to be fine.
Contents
Step 1: Purchase The Right Copper
If you’re TIG welding copper, purchase oxygen-free copper. Some grades of copper have O dissolved within the metal. The O can corrode your weld bead beneath the warmth of TIG weld of copper. Oxygen-free copper doesn’t have this downside, and it takes TIG welds superbly.
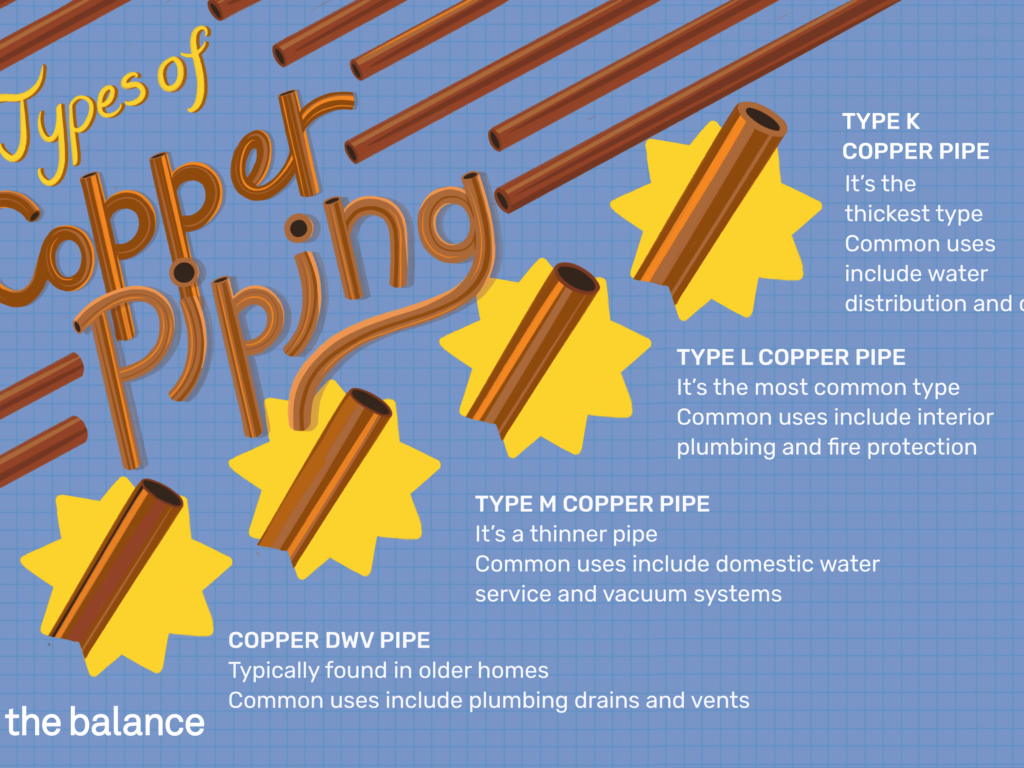
Oxygen-free copper is that the most ordinarily accessible grade of copper accessible nowadays as a result of its most effective grade for electrical applications. You’ll purchase oxygen-free copper from most metal yards. There are totally different grades of oxygen-free copper with differing levels of purity. The ATSM designations for oxygen-free copper are:
- C11000 or electrolytic tough-pitch (ETP) copper for ninety-nine.9% pure copper
- C10200 or oxygen-free (OF) copper for ninety-nine.95% pure
- C10100 or oxygen-free electronic (OFE) copper is ninety-nine.99% pure
There are unit designations for copper with high levels of purity. However, those area units for terribly specialized applications like natural philosophy or warmth exposure.
C11000 is that the least dearly-won grade of oxygen-free copper and is okay for any fastening project. You merely would like the upper grades if AN engineer specifics them during a fastening arrangement.
Don’t purchase second-hand copper from scrapyards for TIG welding copper. If the copper isn’t oxygen-free, the welds can bubble and crack. they’ll even corrode. Unsound welds are going to be weak and brittle. If you don’t use oxygen-free copper, your welds are going to be ugly at the best. At worst, they won’t hold.
Copper for Food (and Drink)
If you’re fastening copper for handling potable water (or stronger drinks), use pure copper-not alloys. Alloys will leach metals into the liquid that aren’t sensible for drinking. The natural process is worse at high temperatures, like boiling a liquid and containing the steam.

Some metals will even cause vision defects if eaten. If you’re building copper for food handling, don’t use scrap copper-only new. it’s dangerous to construct food-handling instrumentality from unknown grades of metal.
Step 2: Gather Alternative Materials
In addition to the fabric being welded, TIG welding needs a conductor to hold the present, a separate rod that melts to make the weld. And shielding gas to safeguard the weld from corrosion beneath the warmth of the arc.
Choosing a conductor
Many different electrodes may be wont to TIG weld copper. Some suggested electrodes include:
- 1.5% lanthanide W (gold tip)
- 2% lanthanide W (blue tip)
- Thoriated W (red tip)
- Rare earth combine (purple tip)
- Created W (grey tip)
Any of those electrodes will with success weld copper. Everyone has its characteristics in terms of simple placing AN arc, durability, and fitness for AC or DC settings. Select one that you simply area unit accustomed to, or experiment to examine what works best for you.
Rods For Fastening Copper
Unlike different kinds of fastening, in TIG fastening the rod is become independent from the conductor. Whereas you hold the conductor with one hand to create AN arc, you would like to feed the rod in with the opposite hand to induce a weld puddle and extend the weld.
For high-end jobs, deoxidized copper TIG rods area unit accessible. These rods area units developed for TIG welding copper and can give a clean, attractive, and robust weld. Once the weld has cooled, the color of the weld is going to be virtually precisely the same because of the copper piece of work. These rods aren’t low-cost, however, they’re going to offer wonderful results.
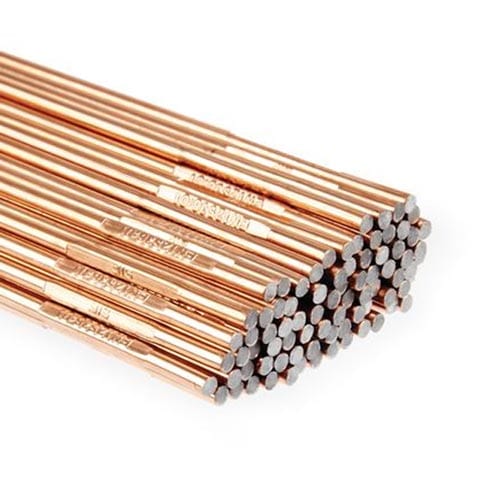
For stronger welds, select silicon-bronze rods. These rods can provide a robust and sturdy joint. Silicon-bronze rods area unit quite common, and their area unit is more cost-effective than pure copper rods. These rods also are appropriate for connexion totally different metals along, therefore reach for them if you would like to hitch copper to steel or iron.
More Information:
If a look could be a concern, you’ll conjointly use 1/8 in. strips of parent metal as fastening rods. Trim skinny strips of stuff from the sticking copper and use them as fastening rods. the ultimate weld is going to be an equivalent color because of the base material. With a touch of grinding, the finished piece can look as if it wasn’t welded the least bit. this can be conjointly a wonderful thanks to assigning scraps of copper that don’t value utilization.
If you’re simply active in your copper welds, you’ll use stripped Romex wire as a fastening rod. It won’t be as robust or engaging as mistreatment industrial rods or the parent metal, however, Romex is reasonable and straightforward to seek out. several retailers have a coil, or 2 of Romex stashed somewhere that may be a place to use.
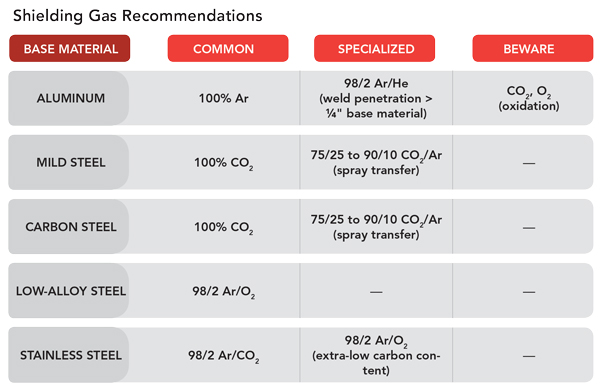
Shielding Gas
Metals oxidize quickly beneath the intense heat of TIG fastening. to forestall this, TIG welders feed a gentle stream of AN inert shielding gas into the arc to safeguard the weld whereas it’s therefore hot. There area unit a spread of gasses and gas mixes accessible for TIG weld for copper.
For TIG welding copper, use a pure element or eightieth element / two-hundredth chemical element for the shielding gas combine. Pure element transmits one.7 times a lot of heat than pure chemical element. Copper needs a lot of heat to weld, therefore obtaining the foremost out of your shielding gas is useful. If you’re fastening thick material or your craftsman has restricted amps, use pure element.
Step 3: Alternative Instrumentality Required
All the instrumentality required for fastening copper is accessible during a well-stocked fastening look. Gather your instrumentality before you begin functioning on the project. you’ll need:
- Bench grinder: For getting ready the conductor before you weld
- Wire brush: For removing oxidization from the weld surface to the weld can hold. the most effective brushes for cleanup copper have fine-textured chrome steel bristles. Use a passionate brush for copper; don’t attempt to clean with a brush that has all types of crud on that already.
- Acetone or another solvent: To get rid of all traces of grease, paint, and alternative contaminants from the weld surface. Citrus degreaser is additionally a decent alternative for cleanup metal, and it’s not burnable
- Protective instrumentality: To stay safe and secure whereas you weld. you would like a mask, gloves, long-sleeved shirt or animal skin jacket, and significant jeans or fastening chaps.
- Respirator mask: To safeguard you from toxicant copper fumes
- Propane torch: To heat up the piece of work
Step 4: Sharpen The Conductor
Copper welds best with a pointed conductor. If your conductor doesn’t have a purpose point, use a bench grinder to refresh the tip. New electrodes may be purchased with a pointy tip. Once the tip is prepared, place the conductor into the collet and tighten it. Modify the gas flow on the handpiece supported the manufacturer’s recommendations.

If you’re doing a lot of TIG fastening, you’ll save time on sharpening conductors with an electrode grinder. These work sort of a pencil implement (except for tungsten!) to quickly offer you excellent points on your electrodes.
Step 5: Created The Craftsman
Copper could be a conductor and needs a lot of heat to weld. Some execs use the maximum amount as three hundred to four hundred amps for thick items of copper. You would like a giant craftsman to place out the amps needed for thick copper. Consult the manual for your explicit craftsman for the most effective settings to TIG weld copper. Unless you’re operating with terribly skinny sheets, you’ll crank the amps up while not damaging the copper.
After the craftsman is ready up, make certain to attach the come back clamp from the craftsman to the piece of work or the work table. You can’t get a spark if you don’t have a circuit.
Double-check the grounding for your craftsman similarly. Copper could be a nice conductor of electricity, and any downside with the grounding will cause it to shock you. You must continuously check the grounding, however, build a degree to see if you’re operating with huge items of copper. Check that to not bit the copper with vacant skin to avoid shocks.
Step 6: Clean The Copper
Clean the copper well. Take away paint and grease with a solvent like a dissolving agent, alkyl radical ethyl radical organic compound, or lacquer agent. If there’s any coating or oxidization on the surface, scrub it off with a fine-bristle chrome steel brush. The weld won’t hold if you are trying to figure it with a grimy surface.
If the surface has never been painted, you don’t use a solvent. employing a citrus-based degreaser is effective in removing all traces of grease. Degreaser smells far better than solvents, and it’s not burnable. That’s a pleasant characteristic during a fastening look.
Step 7: Place Away Solvents
If you used a burnable solvent to scrub the copper, place it away currently. You don’t wish to possess volatile chemicals out once you area unit handling the high heat of fastening. The copper you’re fastening is doubtless hot enough to ignite solvents on its own. Check that it doesn’t have the possibility.

Step 8: Check Ventilation
Make sure you’ve got wonderful ventilation once TIG welding copper. Copper fumes created by TIG fastening area unit toxicant. If you aren’t positive regarding the ventilation, you must wear a respirator whereas fastening. Symptoms of eupneic copper take four to 12 hours to seem, therefore you probably won’t understand you’ve got a haul till you’re finished fastening. Wear the respirator, despite the fact that it’s uncomfortable.
Step 9: Dress For Welding
You always would like a mask, gloves, and canopy for your higher body once fastening. you’ll wear an animal skin fastening jacket or a long-sleeved, noncombustible shirt to weld. For fastening copper, you would like a touch of further protection similarly.

Copper is that the best conductor of warmth that the majority of individuals can ever weld. the warmth from fastening can quickly unfold throughout the whole piece. If you’re operating with giant items, check that to possess enough wear on your legs similarly to your arms to stay from being burned if you contact the copper aloof from the weld. Have many cold drinkable obtainable and take breaks before you overheat.
Step 10: Heat up The Copper
Because copper can absorb heat quickly and distribute the warmth through the complete workpiece, it may be laborious to stay in a weld puddle. To assist the copper to keep hot enough to weld, heat up the entire half to a temperature between three hundred and 750 degrees. This is often significantly vital for sheet copper as a result of the warmth spreads altogether directions. A pipe could be a very little easier to stay hot as a result of the warmth can’t unfold as so much.
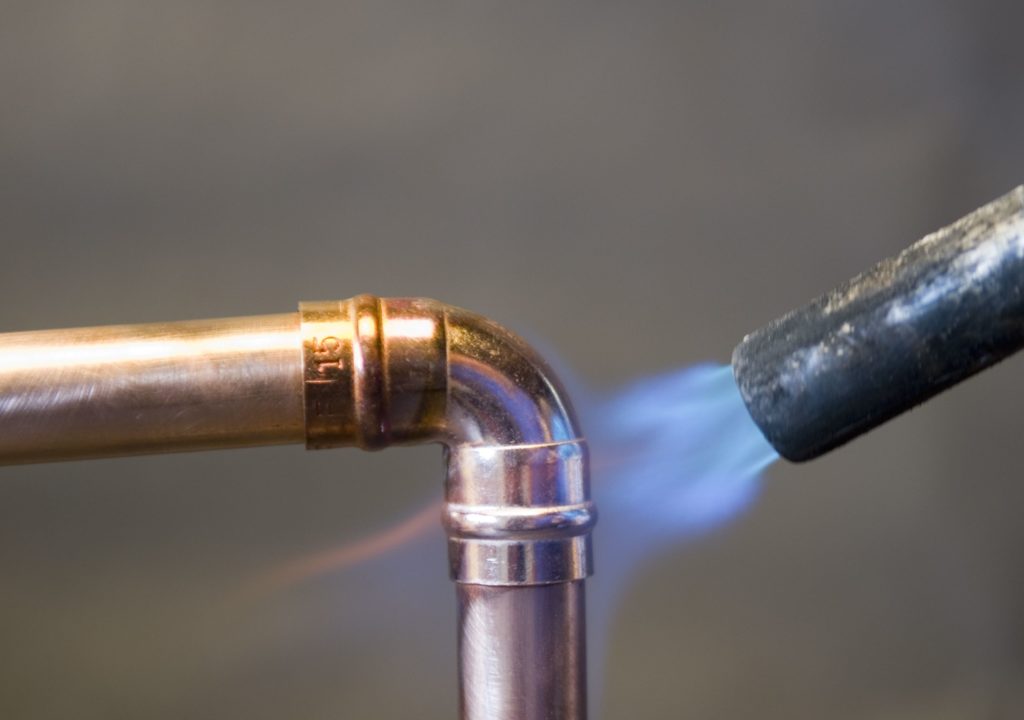
To heat up your piece, use a fuel torch over the entire surface of the project to bring the temperature up quickly. Copper is simple to heat, and hot spots aren’t a giant downside. The warmth can flow equally through the piece as you employ the torch.
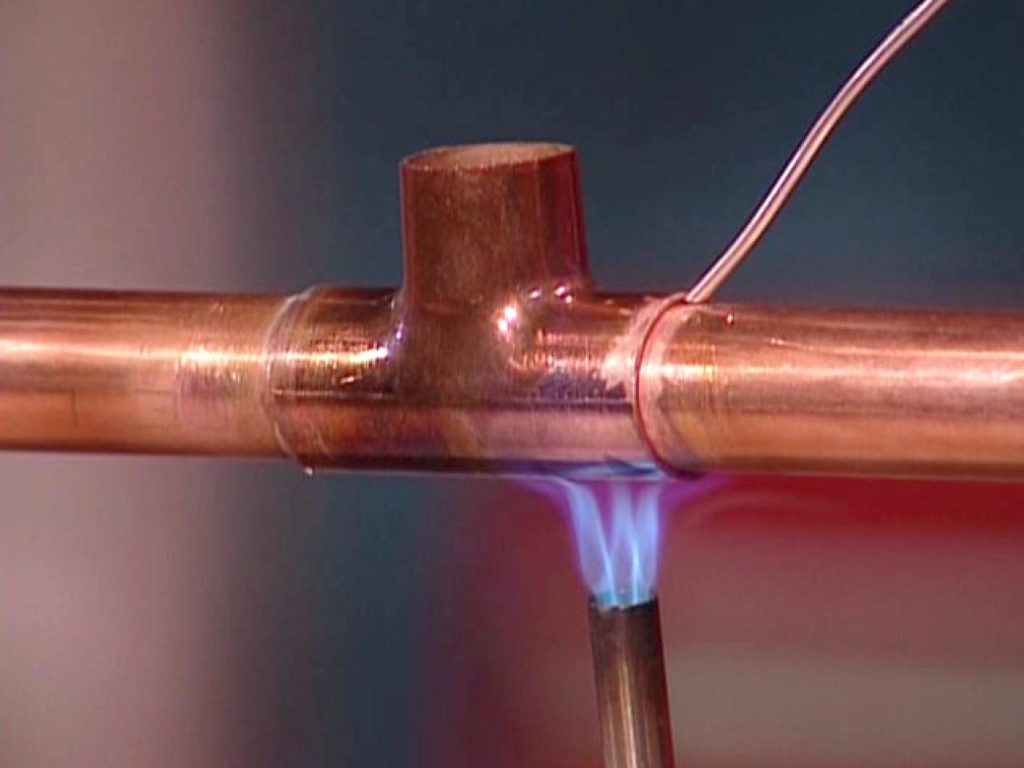
Step 11: Weld The Joint
When you area unit able to weld, place the items along, and secure them in situ. To crack a spark, hold the tip of the conductor regarding an in. from the joint and press the pedal along with your foot. Hold the arc at seventy degrees to the surface of the copper. Strike Associate in Nursing ark and push within the rod to create a puddle.
Once you have got a puddle, use the tip of the rod to unfold the bead down the joint. Keep feeding the rod into the weld and spreading the pool with the rod. Once you have got started the weld, copper is simple to figure with. Keep the arc going and feed the rod at a gradual rate.
If you’re operating with terribly skinny sheets, take care regarding distortion. The Brobdingnagian heat from TIG fastening will warp the fabric. If you’re operating with terribly skinny or delicate items, brazing or attachment could be an improved selection than TIG fastening.
Step 12: Cool Slowly
Cool copper welds slowly to forestall weld cracking. Preheating the complete piece helps with this as there’s additional heat to dissipate. Hiding the half within the sand or covering it with a fiberglass blanket can even slow the cooling method. Provides it many times to cool down before you are doing anything with it.
Well, now that you have reached the end of this article, you should be able to know how to TIG weld copper. If you liked this article, then make sure to also check out the following source for more in-depth details!
Want to know about other methods of welding? Click here to get yourself started on other methods of welding too.
So what are you waiting for? Get your hands dirty and to working on your next welding project through our TIG welding copper steps!


Leave a Reply