Learning how to weld involves understanding many little things. Equipment for welding, electrodes, filler material, welding beads, and different welding techniques, all require a lot of attention to be learned.
Today our main discussion will be on welding beads. Have you ever worked with welding beads? If yes then it is going to be a lot more convenient and quicker for you to understand.
And if not then no need to worry, we will explain every single detail that you need to know so you won’t have any confusion left.
Moreover, during your job, you will have to work with a variety of welding beads. So without wasting much time, why don’t we start discussing them?
Contents
Welding beads
First of all, we need to know what exactly is a welding bead to better understand the concept.
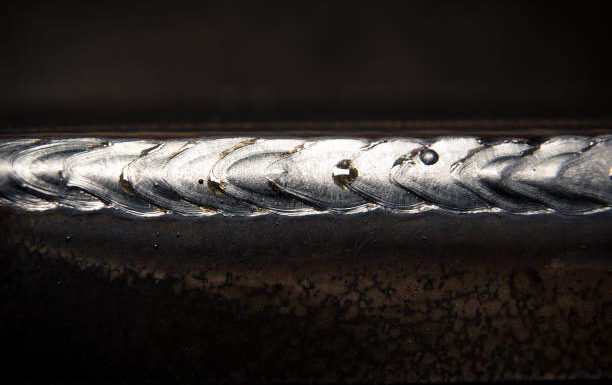
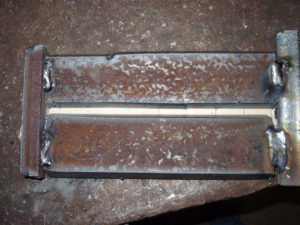
When you are joining two metal pieces together, a weld bead is created when filler material is filled between the joints of metals. Welding can give a pleasant outcome by making the joint strong and attractive.
Here filler material is applied all over the joints to make sure the two metal pieces come in contact with each other. All of this is possible by just using a heat application and you can weld different types of materials together.

How does it work?
When you melt the filler material so you can fill the gap between the joints of metals, a weld bead is formed.
What type of welding bead is formed? That depends on how you are moving the torch. The movement of the torch along with the flow of the weld pool is quite important for bead formation.
Using different torch movements
Now, you must be thinking “Why do we have to use different movements of the torch?”
Just like sewing, where you needle in different ways to sew two pieces of cloth together, using a torch is no different than this.
Due to the nature of work, welders have to perform their tasks in different awkward and embarrassing positions.
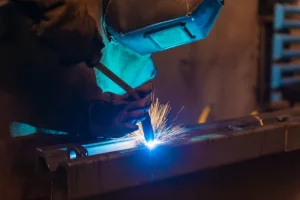
In addition, gravity also matters when you are doing a certain weld. If you welding a material right above your head, then you should be very careful with your safety.
There is a high probability that the melted filler material will fall onto your face if your welding speed is slow. So make sure you are wearing safety gloves and a welding mask for your protection.
Categories of welding beads
As already said above, the type of welding bead formed during your weld depends on the torch movement and welding speed as well. Based on some differences, welding beads can be divided into two main categories:
- Weave beads
- Stringer beads
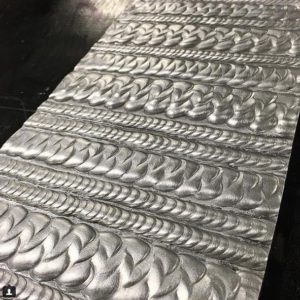
Weave beads
Just as the name suggests, it is very similar to weaving. You are free to choose the type of weave beads you want on your weld.
The method can be different if we compare the working nature of welders. Some welders prefer to do a lot of heavy weaving to make beads faster in a short time. While some work side by side along the metal to make a broad and wider weld.
Of course, weaving beads come in different types as well. You can choose how you want your weld to look in appearance as per your liking. For example:
- Curlycue weave
- Convex weave
- Concave weave
- Triangle weave
- Crescent weave
- Jagged weave
- Zig-zag weave
- Ladder weave etc
Uses of weaving beads
Besides using them for making wider welds, they have a variety of other uses as well:
- To fill a steep pocket, a triangle weave is best to use.
- In addition to that, weaving is also capable of controlling the heat of weld puddles.
- To achieve good cohesion between the joints, you can also stop on each side of the weld during welding. It can prevent undercutting.
- However, while welding the center of the joint, if you try to move faster then there is a chance that you will make a bump in the middle. To avoid this situation, it is advised to leave your weld slightly convex or flat during weaving.
- Try using a semi-circular weave if you want to avoid the expansion or overheating of the weld puddle.
- While welding the edges of metal, weaving beads provide better fusion.
- Lastly, whether you want or not, you should learn overhead weaving because it can make your work a lot easier and more efficient.
- Weaving is only allowed to be done three times the thickness of electrode diameter.
- Immense weaving can cause the weld to be porous.
- With weaving, the weakness of weld metal increases as compared to the original metal.
- During alloy steel welding, weaving is advised to be minimized.
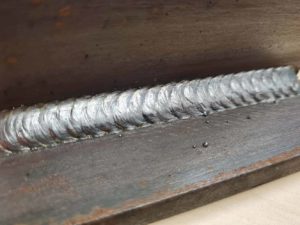
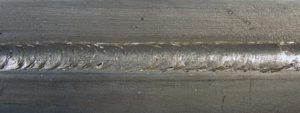
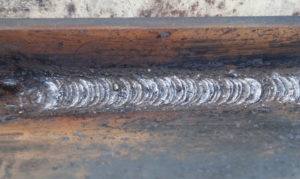
Stringer beads
It is a very simple process of dragging the welding torch by pushing or pulling it in a back-and-forth motion. A welder follows a unique pattern, welding back and forth making straight lines of the weld.

Pulling method
When it comes to dragging, the electrode is placed at a forward angle in the welding direction. Here electrode leads the weld pool and ensures maximum penetration throughout the welding zone.
Pushing method
When it comes to welding thin or sensitive metals, welders use the push technique to weld.
Also while welding a vertical zone, the weld pool automatically falls in the downward direction. To prevent that, a welder can use a pushing method to keep the heat away from the welding pool. In this way, the molten weld will be spread thoroughly and it will quickly solidify.
However, this method does not provide enough penetration to the weld as compared to the dragging method.
Types of welding beads
Welding beads are further divided into the following types:
- TIG welding beads
- MIG welding beads
- Flux-cored MIG welding beads
- Stick welding beads
TIG welding beads
TIG welding beads have a stacked-up appearance because the welder adds additional filler material in the welding zones.

Also, the way of adding additional filler material is up to you. Your experiment will be considered successful as long as you get an effective bead.
How does it work?
Now coming towards the welding process, things can vary depending on your job requirement and the working size of the project. That’s the reason you have to change the method and frequency according to the project you are working on.
These TIG welding beads give an appearance of a stack of dimes. TIG welding has a smooth flow and filler material can be applied conveniently using a TIG gun.
But this doesn’t mean that you will be able to weld as you want. There are some times when some unforeseen factors get in the way and you do not get the result you were looking for.
So, to avoid such issues, you must undergo proper training and practice to get skilled.
Walking the cup
If you are not experienced enough, then there is another option for you. “Walking the cup” is quite simpler than a stack of dimes.
In this technique, the welder is holding the electrode in a cup in one hand while using the other hand to move the torch back and forth at the same time.
This way, filler material spreads equally around the welding zone covering a wider region just like you spread jam on bread.
MIG welding beads
Among some of the best techniques to make effective beads, hardware MIG is a very flexible technique. Now people in the welding field debate quite often whether to use the pulling method or the dragging method to handle weld puddles.
We always prefer the technique which can give us a stronger weld. But here this case, we cannot decide which technique gives a better result when compared to the other one. Flux coating is not a requirement in hardware MIG.
Preventing slag formation
In the welding field, you will often get to hear a famous saying: “You need to drag if there is any slag”.
The reason they say it is because in some cases slag gets trapped in the joints if you are using a flux-cored MIG gun or stick rod. It will result in metal porosity. While using the dragging method, slag formation occurs on the back of the puddle. And as you move forward, it gets hardened.
Placing an object beneath the workpiece
Sometimes during the pushing and pulling method, there is a chance of having cracks in the weld. To prevent this, some welder uses an object to shield their workpiece. It prevents the metal from oxidation and spatters.
In this case, the object is placed beneath the metal as a seal between the metal and the ground. But if the object is placed too close to the working metal, the heat coming from the welding torch will cause the object to melt.
Welding patterns
MIG welding beads are done using stringer beads in a straight line. Weaving is not preferred by the majority of welders. No doubt stringer beads can give effective welds but using weave beads can cover a wider area as they spread filler material throughout the welding zone.
MIG like TIG
There is a trend that is getting popular these days in welding known as “MIG like TIG”. In this technique, by doing some alterations in the original MIG welding method, the resulting beads are formed just like dimes mentioned in TIG welding beads.
The heat supplied to the weld is quite low. That’s why the resulting beads are not strong. But they preferred because their appearance is clean.
Flux-cored MIG welding beads
The main advantage of flux-cored MIG welding can settle a large amount of filler material in a short period. Stringer beads are used for this technique.
However, while making vertical welds, weaver beads are advised to control the weld pool. In case the weld gets too hot, there is a chance that the metal pool will fall on the ground.
Using weaver beads can prevent the weld pool from dropping because it can control the heat supplied to the weld.
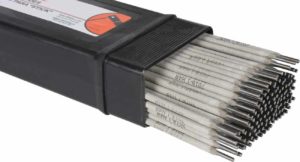
Stick welding beads
The welding rods used in stick welding have low hydrogen concentrations. That’s why they are flexible to use.
7018 stick rods
Stringer welding beads can be applied using the dragging method on 7018 stick welding roads. It is quite convenient for horizontal areas.
However, for the vertical welding process, using weaver beads is advised. You are allowed to be creative while working on vertical welds. You can add multiple weaves throughout the weld.
Miami freeze technique
Steel welding with the help of stick rods is very similar to making sculptures. A famous technique known as the “Miami freeze technique” as the name suggests was introduced in Miami.
For a long time, welders kept the method of this technique confidential. 7010 stick rods are used for this process. Here, the weld results in the formation of open roots.
And just like other welding techniques, the stick requires an extra heat treatment for the weld. This heating temperature is almost around 1000 Fahrenheit but it doesn’t harm the base metal.
Whip and pause technique
This technique can produce welds similar to TIG welds. Using 6010 and 7010 rods, you can perform this method for getting dimes just like in the TIG welding process. They don’t resemble much but are quite evident.
Wrapping up
Now that you know how important the torch movement is, then by gaining knowledge and experience related to several techniques can help you get effective and strong welds.
People give different opinions about choosing a certain technique and gaining expertise in that technique. But the best advice is to learn stick welding beads, MIG welding beads, and TIG welding beads. Because these three will help you throughout your welding career.
You have to fill the joints with the filler material to get a smooth finish, in that way you will be able to cover wider areas. Not only this, but you have to double-check your welding equipment along with the right selection of filler material and electrode.
The above four methods are explained in the easiest way for you to understand quickly. But to gain experience and skills, you might have to do little alterations and manipulations in the welding process.


